Showing posts with label tutorials. Show all posts

Monday, 8 November 2010

All Glory to the Hypnotoad

This guy has figured out how to get that hypnotoad sound - and written a pretty cool article about how he did it. Well worth a read for the synth heads and Futurama fans among you.....
And for the rest of you, here's a classic episode of Everybody Loves Hypnotoad......


"All Glory to the Hypnotoad" > read the full post

Thursday, 27 May 2010

Logic, an iPad and AC-7 Pro

I too was a bit of a cynic when it came to the iPad. What would I use it for? Do I really need one? Well, we've got our early iPad delivery, and I've been putting some of the audio software through its paces, starting with Saitara's AC-7 DAW controller.
There'll be a full review over the next 24 hours, but as it's a bit fiddly to get AC-7 Pro up and running with Logic, here's a getting started guide.....
Installing the ap on the iPad is as simple as ever, but once you open AC-7, you'll quickly realise there's no setup menu - everything else has to be done from the computer.

Edit: we've heard from the guys at Saitara, and they recommend setting up a private network between your Mac and the iPad. Given it a try, and it's a much more stable option. This is easy:

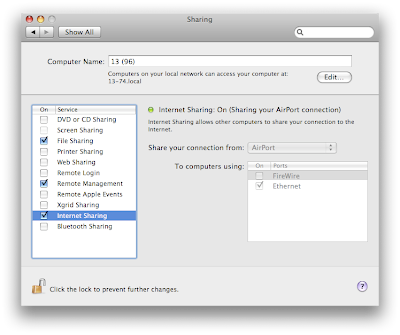
Step 1: Go to System Preferences> Sharing
Step 2: Turn on internet sharing (From Airport)

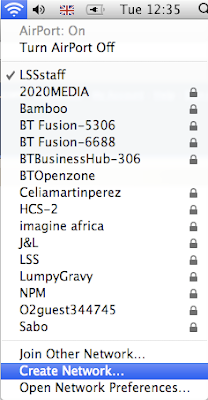
Step 3: From the Airport menu bar, create a Network

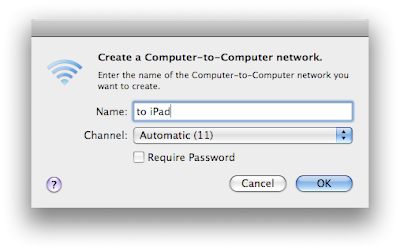
Step 4: Give the network a name

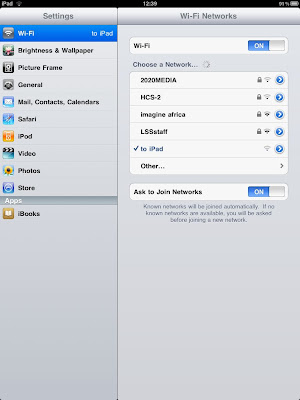
Step 5: Open the iPad WiFi settings, and choose your new network

That's it, your network is ready. OK, you won't be able to use wireless internet at the same time, but let's face it, you should be concentrating on mixing...

You'll need a couple of applications installed on the Mac, starting with DSMI Server for OSX (this is confusingly called DS MIDIwi-fi).
This allows you to send MIDI from one device to another over W--Fi, without having to set up a LAN. Once you open the ap, DS MIDIWi-fi appears as a MIDI port.

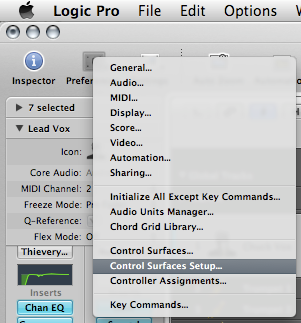
Open up Logic, and from Preferences, go to Control Surfaces Setup

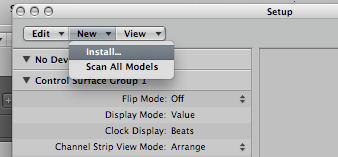
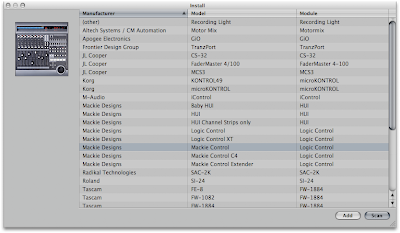
Select a New Install, and select a new Mackie Control, and press Add


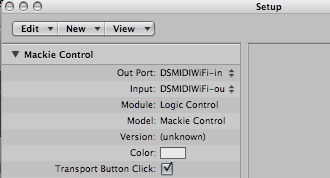
Next, set the Out Port and Input to DSMIDIWiFi
Open up the AC-7 ap on your iPad, and you're up and running. It can be a bit buggy, so try moving a few faders up and down, as well as moving along banks of faders (as a good indicator, the play button on AC-7 should glow green when the sequence is playing).

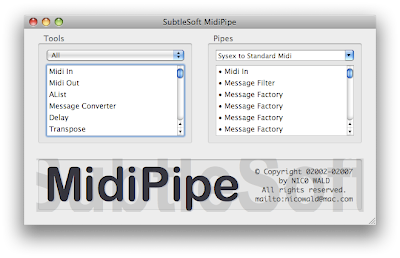
Trouble is, there is currently no way to see the Logic track names on the iPad. For this, you'll need MIDIPipe installed, and this .mpmi file (MIDIPipe setup file).
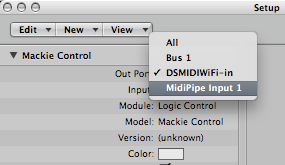
Run the AC-7 ProMC.mpmi file, and change the Out Port in the Logic Control surface setup to MidiPipe Input 1

That's it - you're up and running.
We'll do a proper review over the next couple of day, so we'll see you back here soon!


"Logic, an iPad and AC-7 Pro" > read the full post

Wednesday, 14 April 2010

Free Ableton Live Pack from ESKAMON


ill.Gates introduces a new free Ableton Live Pack: Fine Objects, created for Eskamon - a collaboration between Amon Tobin (Ninja Tune) and Eskmo (Warp, Planet Mu, Ancestor). Read on.....

"Fine Objects" is the result of the pair's unique take on sonic exploration and the manipulation of field recordings. From the onset, the two went out with a recorder, gathering sounds from around the house, yard and studio. Material recorded out of the studio included sounds from a parking garage elevator, a broken harp and the droning tones from a discarded piano. These were combined with more home-centric sounds to form the central theme to the song.

With lumbering alien bass and intentially dry, off-kilter percussion, "Objects" quickly grew into it's own symbolic representation of taking "odd pieces" and allowing them to grow into something a bit more "refined and ablaze."


As part of the release ESKAMON released a free WAV sample pack of the sounds created in the song (they want your email address first, then you can download for free). From these original WAVs, an Ableton Live pack was also created by ill.Gates for the project and give out for free with the release as well. This video is the tutorial ill.Gates shot to help explain the features he made on the Ableton side of the project.

Check it out and leave a comment with your thoughts:


"Free Ableton Live Pack from ESKAMON" > read the full post

Thursday, 1 April 2010

FM Synthesis Video Tutorials

Brian Trifon presents a 3-part video series of FM synthesis tutorials using Native Instruments FM8. Great videos, and very helpful for anyone interested in FM synthesis, or synthesis in general. They can be easily applied to other synths as well (i.e. not just FM8).

Read on to watch the videos........


"FM Synthesis Video Tutorials" > read the full post

Monday, 15 March 2010

Recreating Prodigy's "Smack My Bitch Up" in Ableton Live


Prodigy's track "Smack My Bitch Up" from the album "The Fat of the Land" was mostly created by sampling. In this video, we are shown which samples were used by Liam in the track. Reworked by Jim Pavloff in Ableton Live. Pavloff shows the source of every sample used by Liam in the song, how it was edited, and effected. He also shows how to create the acid line, and even takes you through how to master the mixed track. Not bad!

Read on to watch the video...


There are similar videos, demonstrating how to recreate other tracks, under the same YouTube channel - browse to satisfy curiosity!


"Recreating Prodigy's "Smack My Bitch Up" in Ableton Live" > read the full post

Friday, 18 December 2009

Smack my bitch up - Ableton style


Thanks to Rhys for sending me this link - how to make The Prodigy's Smack my bitch up in Live, complete with the sample resources.....


"Smack my bitch up - Ableton style" > read the full post

Monday, 12 October 2009

Freemasons Master Class (Become a Dance Music Superstar)

The British Music Experience are presenting a unique chance to interact with one of the UK's most successful DJ and Producer teams, The Freemasons.....


Dance music superstars Freemasons are giving a masterclass on Thursday 26th November 2009 at The British Music Experience. Sounds like decent value for £8 and access to the exhibition as well, see the BME hyper link for more details.


"Freemasons Master Class (Become a Dance Music Superstar)" > read the full post

Monday, 31 August 2009

Create your own plugins!


SonicBirth is a free, open source application that allows you to design your own Audio Units and VST plugins on your Mac. It's been around a little while, but it's very powerful, and great fun.....

You need SonicBirth installed on your Mac to run any of the plugins, as well as to create your own (well, you need the Framework at least). Start by downloading it here.
It can be a bit intimidating if you've never used anything like this before, so I've written a walkthrough to create a delay plugin.
1) We'll start by opening an audio file in our Sound Server window. This will be used for testing our circuit. Just click on the Open button, and navigate to something suitable. I'm using a beep, followed by 4 seconds of silence (this is long enough to loop, and gives me time to hear long delay feedbacks).

2) Next, let's set up the Dry signal path. Insert an Addition, a Slider and a Multiplication element in the Circuit window (the slightly orange one). You'll find all these under the Common category.

3) Clicking in the boxes at the sides of the elements allows you to patch them together using "wires". Connect the elements as shown in the diagram below (clicking on the wire allows you to create extra points, so you can keep your patching neat and clear). I've also named the slider "Dry" in the Settings window.
(Multiplication elements allow us to control signal levels - multiply the sample value by a number less than 1, and you turn down the level).
Turn up the Dry pot, and press the spacebar. You'll now hear your test signal.
4) Let's now add our Delay element, and our Wet level control. Insert Delay, Slider and Multiplication elements, and connect them as shown below:

Turn up the Delay and Wet pots, and press the spacebar. You now have a very simple delay plugin, that gives you a single repeat.
5) For multiple repeats, we will need a feedback loop. SonicBirth only allows these when you use a Feedback element. This adds 10 milliseconds latency to any signal passing though it, so we need to be careful where we place it.
Insert Feedback, Mulitplication, Slider and Addition elements, and patch together as shown below:
6) You now have a fully working delay, but before we continue, let's make a couple of modifications: Select the Delay slider element, and tick the Show Value box in the Settings window. I've also changed the Type to milliseconds. It will now be possible to see the delay value on your plugin.

7) Unfortunately, this value will be wrong, as the Feedback element adds 10 milliseconds extra delay. To compensate for this, I've added a Constant Substraction (I assume it's a spelling mistake) element of 0.01 seconds between the slider and Delay elements


8) Click anywhere in the background of the Circuit window, and fill in the Settings window.

We could export this plugin straight away, but it will look very ugly. Let's add a GUI. (Ideally you'll have some kind of graphics application such as Adobe Illustrator or Inkscape). I've designed a simple background and pots that you're welcome to use (just drag the images to your desktop):

9) Click anywhere on the background of the Circuit window. You can now scroll to the bottom of the Settings window, and click on the Custom Gui box. You can now switch between Circuit Design, Gui design and Runtime (try out your plugin). While in Custom Gui, click on [Load], and navigate to your background picture. Arrange the pots in roughly the right places, and move any parameters you don't need below the picure.

Now press [Take Size], and the plugin will shrink to the size of the background pic. All we need to do now is add the pots. Select the pots one at a time, and drag the pot image to the Front box in the Settings window.

Tidy things up a little, and change to Runtime. Give the plugin one last test before we export it as an Audio Unit.
10) It's now time to install your plugin. Go to File > Export as AU. Navigate to Macintosh HD > Library > Audio > Plug-Ins > Components, and press the Open button. You should nw get a little message telling you that export was successful. All that's left to do is open your host application (I'll be using Logic), and try out your own delay plugin.


So, that's got you started. It's time to play around and see what you can do yourselves. Have fun, and let me know if you create anything cool!


"Create your own plugins!" > read the full post

Friday, 21 August 2009

The problem with temperaments

Temperament can be a tricky thing - most instruments use some kind of compromise, which can lead to some strange inter-actions between musical intervals and harmonics....
Let's look at an example:
I play 3 notes: A4, A5 and E6 (the E above A5 - remember, the octave number changes at the C).
Taking A4 as 440Hz, and using the equal temperament system, we can calculate that:

However, the A4 is likely to have a number of harmonics (playing sine waves can get a little boring...) The 3rd harmonic of A4 is simply:

This is 2Hz different from E6, and will cause "beating". More complex chords will have even more complex interactions, and can get very messy. You've probably heard this on a real pipe organ - complex chords sound out of tune with themselves.

Another way to calculate pitch intervals is Just temperament. We can base this on the circle of 5ths: the 5th is 1.5 x the tonic frequency.
This gives us:
This will not clash with the 3rd harmonic of A4, so will give a purer, cleaner chord.
There are many different temperament systems, all which will give different sounds to your chords - and that's not even looking at the non-standard tunings and non-european scales.

Logic has many tuning and temperament settings that are worth playing with (you'll find them under Project Settings, Tuning), from Pythagorean to Bavarian Bagpipe tunings, as well as adaptive (Hermode) tuning, that adjusts the temperament according to the chords playing.

How about real-life instruments? Well, for fretted instruments, there's not much that you can do - until now. Check out the True Temperament guitar necks, with their Curved Frets. Freaky, but very cool!
Anyway, enough nerding - go play with your tuning settings!


"The problem with temperaments" > read the full post

Wednesday, 19 August 2009

Learn DJ Techniques

An exciting event billed as "learn DJ techniques from the turntable masters" caught my eye....read on


Hospital Records are hosting an event at the British Music Experience that should get all aspiring or expert DJs excited. Hosted by BBC radio's Nerm, three artists from Hospital Records; High Contrast, London Elektricity and Logistics, will be discussing how they go about making their trade mark sounds.

The event will run on Friday 4th September from 7.30pm-9.30pm at the
British Music Experience, The O2, North Greenwich SE10 0DX


"Learn DJ Techniques" > read the full post

Friday, 3 July 2009

The Power Claw!

Feel the Power!

In (fairly ridiculous) Digidesign terminology, "Power Claw" means "control + option + command", and it's used for several obscure, but useful shortcuts. Here's a selection of them, but let us know if you find any more.....


1) Reset Waveform Zoom
:
Power Claw + (Square Bracket).
Although you can learn to tell the vertical scales apart, this is a much easier way to zoom back out to the default setting.


2) Fat Meters:
Power Claw + (Click on any meter).
This works in both Mix and Edit windows, and doubles the meter width. Not especially useful, but it does make things a little clearer on screen.


3) Enable Plugin Automation Parameter:
Power Claw + (Click on plugin control).


This brings up the option to enable the parameter automation. It also works to disable automation.

4) Enable All Plugin Automation Parameters:
Power Claw + (Click on Auto button)

5) Make All Plugins in a Row Inactive:
Power Claw + (Click on plugin slot).
OK, this is a variation on "Make Plugin Inactive" (Control + Command + (Click on plugin slot)), with the added Option (apply to all) modifier held down, but this way I get to use my funky Power Claw logo (soon available on a t-shirt!).
This also works on aux sends, tracks and identically numbered track inputs.


6) Previous/Next Track View on all (visible) Tracks:

Power Claw + (left and right arrows).
Cycle through Waveform, Volume, Pan, Mute (etc.) views
Again, leave out the Option modifier to only apply to the currently selected track or tracks.


7) Track Heights All Fit to Window:
Power Claw + (up or down arrow)
A very useful one this. Much quicker than holding the Option modifer and changing the track height. Leaving out the modifier will, of course, zoom the selected track height to fill the screen.


8) Copy Region to the Left:

Power Claw + (click on the region with the Grabber tool)
Similar to the Duplicate shortcut (Command + D), but this puts the region to the left.

(Leaving out the Option will just move the region).

9) Video Codec Options When Bouncing to Quicktime:
You guessed it, hold Power Claw when pulling down the Bounce menu. Not much use to the music guys, but a lifesaver for those in post!


10) Region Rating:
Power Claw + (1 to 5)
Pro Tools 8 brought the option to rate regions from 1 to 5 (5 is best). Very useful when playlist editing and comping.


11) Show/Hide all Floating Windows:
Power Claw + (W)
This will close the transport, locate, timecode etc. floating windows, but, more importantly, will bring them back next time you need them.


12) Scroll the Note Display up and Down:

Power Claw + (Click and drag)
This works in Note and Velocity playlist displays.


13) Scroll Through the Song From the Timebase Ruler:

Power Claw + (Click and drag)
Does exactly what it says on the tin....


14) Copy Selection to Main Playlist:
Power Claw + (V)
One for comping, and easier than right-clicking.


Think that'll do for now!


"The Power Claw!" > read the full post